
Welcome to Easy Open3D, the easy-to-use wrapper around (as well as utility functions and scripts for) some of Open3D ‘s registration functionality.
What is registration?
In 3D data analysis, the term registration usually refers to the process of aligning two partly overlapping point
clouds such that the result is a merged version of the input. It is frequently used to obtain a 3D scan of a large scene
by stitching together several smaller parts.
In robotics however, we can use the same algorithms to register a 3D model of an object (called source) we want to
manipulate to the part of the 3D scan (obtained through depth sensors; called target) of the scene the robot operates
in to find its pose in this scene. The pose of an object consists of its rotation and translation in some coordinate
frame, typically the robots head frame, camera frame or world frame.
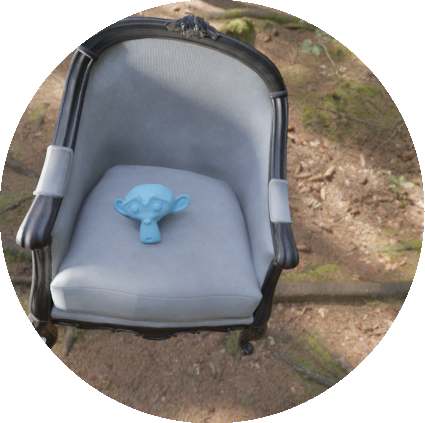
A simple (yet slightly contrived) example
Say we want to find the pose of Blender mascot Suzanne (the blue ape head on the chair) in this scene:
We are also given a 3D model of her (the source) and a depth image of the scene (the target):
The goal is to rotate and move the source around until it matches the position and rotation of the corresponding
points in the target. A successful registration looks like this:
The source (red) and target (gray) point clouds overlap, indicating a tight alignment.
Highlights
- High-level wrappers around global pose estimation and pose refinement.
- Seamless and flexible data loading from various input formats as well as further utility functionality.
- Flexible, fast and easy-to-use scripts to obtain the 6D pose of multiple objects from multiple scenes including hyperparameter optimization.
Installation
The simplest way to install the package is to clone the repository to a local directory:
git clone https://github.com/hummat/easy-o3d
Use Pythons package manager pip to install it into your current Python environment:
pip install /path/to/easy-o3d/repository/clone
To use the provided scripts,
also install the optional dependency scikit-optimize and tabulate:
pip install -e /path/to/easy-o3d/repository/clone[scripts]
(or manually with pip install scikit-optimize tabulate).
Alternatively, you can install the required packages manually and directly import the code from your local clone of the repository:
pip install /path/to/requirements.txt
The required packages (and their version used during development) are:
open3d == 0.12.0- (
scikit-optimize == 0.8.1,tabulate == 0.8.9)pip install open3d==0.12.0 scikit-optimize==0.8.1 tabulate==0.8.9
Usage
Fundamentally, there are two ways to use this project. If you only want to find the pose of some objects in some scenes,
simply throw them at the
run_registration.py script
(and potentially run the hyperopt.py script to
find a suitable set of parameters).
If, on the other hand, you need more fine-grained control and want to make use of the high-level abstraction provided by
the wrapping, just import the project as you would with any other Python package.
1. As a Python package import
This is a simple example to showcase basic functionality. Have a look at the
tutorial.ipynb Jupyter notebook for a more in depth
treatment.
# Import package functionality
from easy_o3d import utils
from easy_o3d.registration import RANSAC, IterativeClosestPoint

# Load source and target data
source_path = "tests/test_data/suzanne.ply"
source = utils.eval_data(data=source_path, number_of_points=10000)

target_path = "tests/test_data/suzanne_on_chair.ply"
target = utils.eval_data(data=target_path, number_of_points=100000)

# Prepare data
source_down, source_feature = utils.process_point_cloud(point_cloud=source,
                                                        downsample=utils.DownsampleTypes.VOXEL,
                                                        downsample_factor=0.01,
                                                        compute_feature=True,
                                                        search_param_knn=100,
                                                        search_param_radius=0.05)

target_down, target_feature = utils.process_point_cloud(point_cloud=target,
                                                        downsample=utils.DownsampleTypes.VOXEL,
                                                        downsample_factor=0.01,
                                                        compute_feature=True,
                                                        search_param_knn=100,
                                                        search_param_radius=0.05)

# Run initializer
ransac = RANSAC()
ransac_result = ransac.run(source=source_down,
                           target=target_down,
                           source_feature=source_feature,
                           target_feature=target_feature)

# Run refiner on initializer result and visualize result
icp = IterativeClosestPoint()
icp_result = icp.run(source=source_down,
                     target=target_down,
                     init=ransac_result.transformation,
                     draw=True,
                     overwrite_colors=True)

# Load ground truth pose data and evaluate result
gt_path = "tests/test_data/ground_truth_pose.json"
gt_transformation = utils.get_ground_truth_pose_from_file(path_to_ground_truth_json=gt_path)
error = utils.get_transformation_error(transformation_estimate=icp_result.transformation,
                                       transformation_ground_truth=gt_transformation)
2. Stand-alone using the provided scripts
The run_registration.py script takes
a registration.ini file as input in which
paths to source and target data as well as all registration hyperparameters are specified. Provided file paths can
either be absolute, or, if relative, must be so in relation to the directory the script is run from.
To run the script, simply use the provided entry point:
run -c /path/to/registration.ini
Alternatively, run it as a Python module, e.g. from within the cloned repository:
python -m scripts.run_registration -c /path/to/registration.ini
To find a suitable set of hyperparameters, the
hyperopt.py script can be used which takes a
hyperopt.ini file as input, resembling the
registration.ini file, but specifies
ranges of values to search over, and produces a
registration.ini as output with the optimal
parameter values found during the hyperparameter search. This can in turn directly be used as input to the
run_registration.py script. Again, there
are two ways to run the script:
hyperopt -c /path/to/hyperopt.ini
python -m scripts.hyperopt -c /path/to/hyperopt.ini
Credits
First and foremost, a huge thanks for the creators and contributors of the awesome Open3D package! The example data used throughout this project was created with Blender and BlenderProc. The former being an awesome open source 3D creation software and the latter being an equally awesome open source synthetic training data generator based on Blender targeted at machine learning applications.